396 W. Washington Blvd. #500
Pasadena, CA 91103
Phone: (800) 981-9663
|
LittleMachineShop.com 396 W. Washington Blvd. #500 Pasadena, CA 91103 Phone: (800) 981-9663 |
||
|
|
||
You have your new mini mill mounted on the bench. You are ready to start cutting metal, but find that you didn't receive any cutting tools with the mini mill. What else do you need to get started?
This document covers mini mills sold by a variety of companies in the US and Canadian market. These mills have tables ranging in size from 15.35" x 3.62" (390 mm x 92 mm) to 18.11" x 4.72" (460 mm x 120 mm).
If you have a similar small mill, you might not need the exact part numbers described in this document, but you will need the same types of tools.
We will discuss what you need for tool holding, cutting tools, work holding, and setup tools. Then we will cover some of the operations you might perform with the mini mill including drilling, milling, surfacing, boring, cutting curves, and indexing.
The two most common cutting tools you will use in the mini mill are drill bits and end mills. Drill bits are held in drill chucks, while end mills are held in collets or end mill holders.
Mini mills come with two types of spindles, R8 and 3 Morse taper. The most common mini mill spindle in the US and Canadian market is R8 however some brands in both countries sell mini mills that have 3 Morse taper spindles. Countries other than the US and Canada most commonly have 3 Morse taper spindles.
 |
 |
|
A Morse taper has a continuous taper from one end to the other. |
An R8 has a straight section with a 16.85° cone taper at the end. |
Most mini mills come with a drill chuck. (At LittleMachineShop.com we find that most factory installed drill chucks are of very low quality. It is for this reason that we have the factory install upgraded drill chucks in all of our HiTorque mini mills.)
There are two types of drill chucks to choose from, keyed chucks and keyless chucks. Keyless chucks offer convenience and safety. Keyed chucks are more economical, and they provide slightly (and only slightly) more holding power. We have keyless chucks on our mini mill and drill press and use them for everything.
A drill chuck alone has no way to mount in the mini mill. A drill chuck arbor has one end that fits in the back of the drill chuck and another end that goes in the mini mill's spindle. The chuck to arbor connection is pretty much permanent. You can remove an arbor from a drill chuck, but it takes a pair of special U-shaped wedges to do it.

|

|
| Part Number |
Product | 3MT Spindle | R8 Spindle |
|
1212 |
X1 | X2 | |
|
3153 |
X1 | X2 | |
|
1660 |
X1 | X2 | |
|
1396 |
X | ||
|
1213 |
X3 | X4 | |
|
4862 |
X3 | X4 | |
|
1659 |
X3 | X4 |
1 With 1806 arbor (Drill Chuck 3MT Drawbar to 33JT)
2 With 1676 arbor (Drill Chuck R8 to 33JT)
3 With 1805 arbor (Drill Chuck 3MT Drawbar to 2JT)
4 With 3999 arbor (Drill Chuck R8 to 2JT)
You can use collets or end mill holders to hold end mills. The world is split about 50/50 on which is better. We will give you the arguments for both sides and let you decide.
|
 |
| Collets | End Mill Holders |
|
Collets are shorter than end mill holders and so give you more vertical work area. |
End mill holders are longer than collets and so let you reach nearer the mini mill's table. |
|
Collets grip the end mill all the way around and so provide a better grip. |
End mill holders have a set screw that bears on the flat on the shank of the end mill and so ensure that the end mill cannot slip. |
|
Collets are more concentric than end mill holders because they grip all the way around the end mill's shank. |
Because they fit the end mill closely end mill holders ensure concentricity. |
|
Collets are less expensive than end mill holders and so can be replaced when they wear out. |
End mill holders are more robust than collets and are less prone to wear out. |
|
It's fun juggling an end mill, a collet and a drawbar all at the same time. |
It is easier to replace an end mill in an end mill holder because the end mill holder can remain in the spindle. |
| Part Number |
Product | 3MT Spindle | R8 Spindle |
|
1604 |
X | ||
|
2030 |
X | ||
|
|
X | ||
|
1615 |
X | ||
|
1948 |
X | ||
|
|
X | ||
|
1258 |
X | ||
|
1636 |
X | ||
|
|
X | ||
|
|
X |
End mill holders, collets, and some drill chucks are held in the spindle by a drawbar. The drawbar extends through the spindle and is tightened from the top of the spindle. Don't tighten the drawbar very tight. It only needs to be snug. If you over tighten the drawbar, it can be very hard to remove Morse taper tooling. R8 tooling is much more forgiving because of the steeper taper.

Mini mills from different distributors come with different types of drawbars.
All R8 mini mills come with a three-piece drawbar that has a 7/16-20 thread on the end. This drawbar works with any R8 tooling, but it less than convenient because it comprises three pieces: the drawbar, a washer, and a nut.
All 3 Morse taper mini mills come with a drawbar with an M12 thread on the end. Grizzly mini mills have a one-piece drawbar, while the others have a three-piece drawbar. Although some 3 Morse taper tooling is available with an M12 drawbar thread, most has a 3/8-16 drawbar thread.
| Part Number |
Product | 3MT Spindle | R8 Spindle |
|
1638 |
X | ||
|
1637 |
X | ||
|
1414 |
X |
Conventional wisdom is that 2-flute end mills are used on aluminum, while 4-flute end mills are used on steel and brass. Take a look at why before you make a choice.
 |
 |
2-flute end mills are used on aluminum because aluminum is easy to machine and you can take big cuts. Two-flute end mills provide a lot of room between the flutes for the big chips produced when making heavy cuts. But on a mini mill, you are probably not as concerned about maximizing production, and thus you are not taking the same big cuts that a production shop might.
4-flute end mills can produce a slightly better finish at the same cutting speeds because there are twice as many cutting edges, each taking off half as much material. But again, if you are not trying to maximize production, you can simply slow the feed rate with a 2-flute end mill for the same effect.
End mills are also classed as "center cutting" or "non center cutting". With a center cutting end mill, you can plunge the end mill into the work as you would a drill. This is important if you are cutting a slot that does not extend to the edge of the part. Center cutting end mills are easy to identify. If the flutes meet in the middle of the end of the end mill, it is a center cutting end mill. In some cases, one of the flutes will be longer, reaching right to the center. If the flutes stop short of the center, leaving a space with no flutes in the center, it is a non center cutting end mill. Virtually all 2-flute end mills are center cutting end mills. Currently, most 4-flute end mills are center cutting. All the end mills that LittleMachineShop.com sells are center cutting end mills.
The 6-piece end mill sets we sell are economical starter sets. Because all the end mills in the set have 3/8" shanks, you only need one end mill holder or collet to use the entire set.
| Part Number |
Product |
|
1242 |
|
|
1243 |
|
|
1245 |
|
|
1244 |
There are two main ways to hold work on a mill's table: with a vise or by clamping the work piece to the table. In our experience, most work can be held in a vise. But from time to time there is a large or odd-shaped work piece that must be clamped to the table.
There are a range of different types of vises that you can use on a mini mill. See our vise comparison page for a good description of the different kinds of vises.

Choose a vise that will handle the work you do. You don't need a 3" vise if the parts you make are a half inch long. While you can usually put small parts in a large vise, it is more convenient to use an appropriate-size vise.
Vise jaws are often too deep for the work. In general, you want the top of the work piece to extend above the top of the vise jaws. To fill the gap from the bottom of the work piece to the "ways" of the vise, you use parallels. Parallels are strips of metal that have been carefully ground so that the top and bottom edges are parallel with very tight tolerances. They usually come in matched pairs. Place one parallel adjacent to each jaw in the vise and place the work piece so it rests on the parallels.
| Part Number |
Product |
|
1591 |
|
|
1647 |
|
|
2500 |
|
|
2024 |
|
|
1699 |
|
|
4740 |
|
|
1590 |
|
|
1756 |
|
|
1757 |
|
|
1893 |
|
|
1232 |
Clamping kits and their accessories, including 1-2-3 blocks, are the "Erector Sets" of work holding. Use the various pieces of the clamping kit as you see fit to hold work pieces to the mini mill's table.

In many cases, you need to lift the work piece off the table, either because the mill spindle won't reach it or because of a projection on the bottom of the work piece. 1-2-3 blocks are precision ground to be flat and parallel. Use them as spacers to lift the work piece. You can also use them as an angle plate by bolting a work piece to the side of the 1-2-3 block and then clamping the 1-2-3 block to the mill table.
| Part Number |
Product |
|
1144 |
|
|
5975 |
|
|
1233 |
Once you have your work piece mounted on the mini mill, you are ready to start cutting metal. Except for one thing: You don't know where the cutting tool is in relation to the work piece. Edge finders and center finders help you determine the relationship between the cutting tool and the work piece.
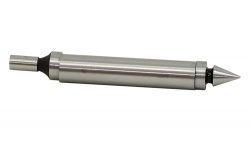
Edge finders locate the edge of the work piece. Center finders locate the center of existing holes. Wigglers locate the intersection of scribed lines on the work piece. See How to Use a Wiggler.
| Part Number |
Product |
|
1240 |
|
|
1959 |
|
|
1822 |
|
|
1961 |
|
|
1960 |
|
|
1823 |
|
|
2279 |
|
|
1603 |
|
|
2294 |
|
|
2278 |
We have looked at the basic tools for getting started with the mini mill. As you work with your mini mill you will come across projects where you need to do something that you can't do with the tools we have discussed, such as surfacing, boring, cutting curves, or indexing.
Surfacing is producing a nice surface finish on a fairly large work piece surface. The goal here is not to remove a lot of metal, but to produce an attractive surface.
A fly cutter uses a single point tool (read lathe tool) to "fly" across a relatively large diameter. This is a relatively slow operation because there is only one cutting tip, and it must run relatively slowly because of the large cutting diameter. But it can produce a nice finish on a large work piece.

A large end mill can also be used for surfacing. As long as the end mill diameter is large relative to the work piece size a good surface can be created.
| Part Number |
Product |
|
1231 |
|
|
3094 |
|
|
4882 |
|
|
5925 |
|
1146 |
|
|
1952 |
|
|
5427 |
Boring is the operation of enlarging holes with a single-point cutter. You can create accurately positioned and accurately round holes by boring.

Boring with a mini mill is usually done with a boring head and boring bars. The boring head provides an adjustable offset for the boring tool so you can enlarge the diameter as you go. The boring bars used are the same as the boring bars you use on a lathe.
| Part Number |
Product | 3MT Spindle | R8 Spindle |
|
3662 |
X | ||
|
5403 |
X | ||
|
3830 |
X |
To cut a curve on a milling machine, you use a rotary table. A rotary table is a device with a round "table" for mounting work that can be rotated under the milling cutter.

| Part Number |
Product |
|
5603 |
|
|
5604 |
|
|
1810 |
|
|
2420 |
|
|
1927 |
Indexing is the process of turning a work piece a certain part of a circle between milling operations. A simple indexing operation is milling the flats on the head of a bolt. A more complex indexing operation is cutting gear teeth.
On mini mills, most indexing is done using a rotary table. The addition of dividing plates makes indexing easier. When working with relatively long work pieces, a tailstock can be used to support the end of the work piece. In many cases, a lathe chuck is mounted on the rotary table to hold the work piece.

Indexing spacers and indexing spin jigs are also used for simple indexing.
We suggest you choose one of the following tooling packages. We design our tooling packages to include everything you need to get started with a new machine. Tooling packages offer tremendous savings over buying individual items, and you know that every part of the tooling package will work with your new machine.

| Part Number |
Product |
|
1262 |
|
|
3490 |
|
|
4491 |
|
|
3489 |
|
|
4723 |
|
|
4858 |
To keep your mill running, we also have a spare parts kit. The kit contains the parts that fail most frequently, including:
| Part Number |
Product |
|
1224 |
Spare Parts Kit, 3MT, Mini Mill
|
|
1703 |
Copyright © 2025 LittleMachineShop.com