Nano-Tram Combo, 1/4" Shank 3651 (Discontinued)
- Includes Nano-Tram Base and Nano-Tram Top for all bench top mills
- Straddles most bench-top mill accessories
- Base is precision ground flat and parallel to .0003” over entire surface
- Nano-Tram Top shank is perpendicular to the face within 0.0003”
- Simply lower the Nano-Tram Top to the Nano-Tram base to tram the spindle
Part Number: 3651 (Discontinued)
Weight: 6.92 lb
Weight: 6.92 lb
Price: $99.95
Share this page:
http://lmscnc.com/3651
http://lmscnc.com/3651

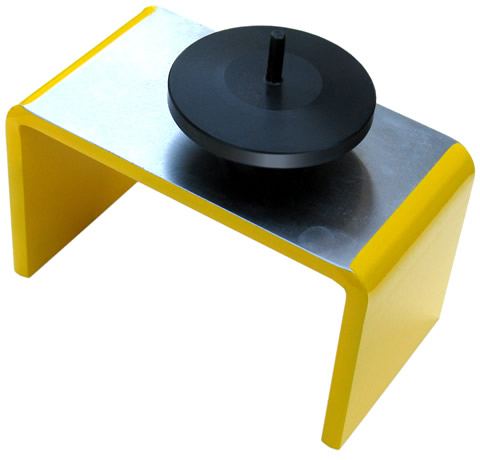
Nano-Tram allows you to quickly and accurately check and align the spindle of a vertical mill perpendicular to the machine table without disturbing the work set-up. This tool works with any bench top vertical mill that will accept a 1/4" tool in the spindle.
The Nano-Tram Base works on most bench top mills and straddles most bench-top mill accessories. This tool is precision ground flat and parallel to .0003” over entire surface and is made from C1020 HR steel. Inside dimensions for Nano-Tram Base are 6.44" between legs x 3.9" underneath gaging surface x 4.0" wide. Material thickness is .375".
The Nano-Tram top is 3.45” in diameter with a .250” diameter shank that is .90” long. Overall height of the tool is 1.375”. Shank is perpendicular to the face within .0003”. Material is 6061-T6 aluminum, hard black anodize.
 Chris' Tips
Compatibility
This product works with the following mills. (If your machine is not on this list, we cannot verify compatibility.)
- Proxxon FF 230 Micro Mill
- Sherline 5000 Mill
- Sherline 5400 Mill
- Sherline 2000 Mill
- Sherline 5800 Mill
- Taig 2018 Micro Mill
- Taig 2019 Micro Mill
- Taig 5019 Micro Mill
- Prazi BF400 Mill
- Prazi BF450 Mill
- Clarke CMD10 Metalworker Micro Mill
- Harbor Freight 47158 Central Machinery Micro Mill
- SIEG X1 Micro Mill
- SIEG SX1 Micro Mill
- LittleMachineShop.com 4660 HiTorque Micro Mill
- LittleMachineShop.com 4700 HiTorque Micro Mill
- SIEG SX1P Micro Mill
- Grizzly G0758 Mill/Drill
- Bolton XJ-9510 Mill/Drill
- Clarke CMD300 Milling Drilling Machine
- Grizzly G8689 Mini Milling Machine
- Hare & Forbes HM-10 Mill/Drill
- Princess Auto 8507667 Powerfist Mini Mill
- SIEG X2-MT3 Mini Mill
- Micro-Mark 82573 MicroLux Milling Machine
Instructions for use:
- Inspect the Nano-Tram Base and Top mill alignment tools for damage in shipping.
- Clean mill table by removing all chips, coolant and debris. With your bare hand, check the area of the mill table for nicks, burrs or other defects. If any exist, they MUST be removed. This can be done with a medium to fine-grit oilstone.
- Next, remove any chips, debris, nicks or burrs from inside and outside the mill collet. Also clean the taper of the spindle.
- Once you are satisfied the mill table, collet and spindle are in good condition, mount the Nano-Tram Top in the collet and tighten in the spindle then place the Nano-Tram Base over your work.
- Bring the face of the Nano-Tram Top down until it makes contact with the top surface of the Nano-Tram Base. Slightly loosen the clamping screws on the head of the mill. Position the Top so it is flush with the surface of the Base and tighten the clamping screws.
- Final adjustments can be made by inserting a piece of paper between the Nano-Tram Top and the surface of the Base, then gently moving the paper from side to side, to find contact points between the Top and the Base. A .001” feeler gage may also be used.
 Tooling Package, Mini Lathe, 0XA QCTP
 DVD: Cutting Balls & Radiuses on the Lathe CLOSEOUT